
UI Automator Viewer를 이용하여 Element의 정보 확인하기
UI Automator Viewer
https://candletheif.tistory.com/37
Appium을 통한 자동화 테스팅 준비 - 환경 설정 및 실행
환경 설정 및 실행 https://candletheif.tistory.com/36 Appium을 통한 자동화 테스팅 준비 - 환경 설치 자동화 테스팅 테스팅은 제품의 품질과 요구사항 만족을 위해 꼭 필요한 과정입니다. 많은 시간을 들
candletheif.tistory.com
지난번 게시글에서 Appium을 이용하여 환경 설정 및 실행을 진행하였습니다.
오늘은 UI Automator Viewer를 이용하여 Element의 정보를 확인하고 탭해보는 방법을 알아보겠습니다.

위 링크의 게시글에서 설명해드린 대로 안드로이드 스튜디오를 설치하셨다면 UI Automator Viwer도 같이 설치되었을 겁니다.
자기가 설치한 경로마다 다르지만 대부분 C:\Users\USER\AppData\Local\Android\Sdk\tools\bin에 위치해 있을 것입니다.
UI Automator Viwer를 실행했다면 다음과 같이 프로그램이 실행됩니다.
왼쪽 상단 두 번째에 위치한 Device Screenshot 버튼을 탭하면 PC에 연결한 디바이스의 화면을 캡처하여 Elememt의 정보들을 얻을 수 있습니다.
지난번 환경 테스트에서 설치한 구글의 계산기 앱을 통해 Elememt의 정보 얻는 방법을 확인해보겠습니다.
계산기 앱을 실행하고 Device Screenshot 버튼을 탭하면 다음과 같은 모습을 확인할 수 있습니다.
①디바이스 캡처 화면 : 현재 실행 중인 앱의 화면입니다. 마우스를 가져다 Elememt에 올려두면 오른쪽에서 정보를 확인할 수 있습니다.
②그룹 및 Element의 좌표 : 선택한 Elememt가 속한 그룹과 좌표를 확인할 수 있습니다.
③선택한 Element의 정보 : 선택한 Elememt의 정보를 확인할 수 있습니다.
위의 정보를 활용하여 Elememt를 찾고 탭하는 코드를 작성해보겠습니다.
xpath
xpath를 이용하면 더욱 정확하게 Elememt를 찾아낼 수 있습니다.
xpath를 이용하는 코드는 다음과 같습니다.
driver = new AndroidDriver<>(new URL("http://127.0.0.1:4723/wd/hub"), capabilities);

driver.findElementByXPath("//class['정보']").click();
코드만으로는 감이 오지 않을 테니 직접 실행해보겠습니다.
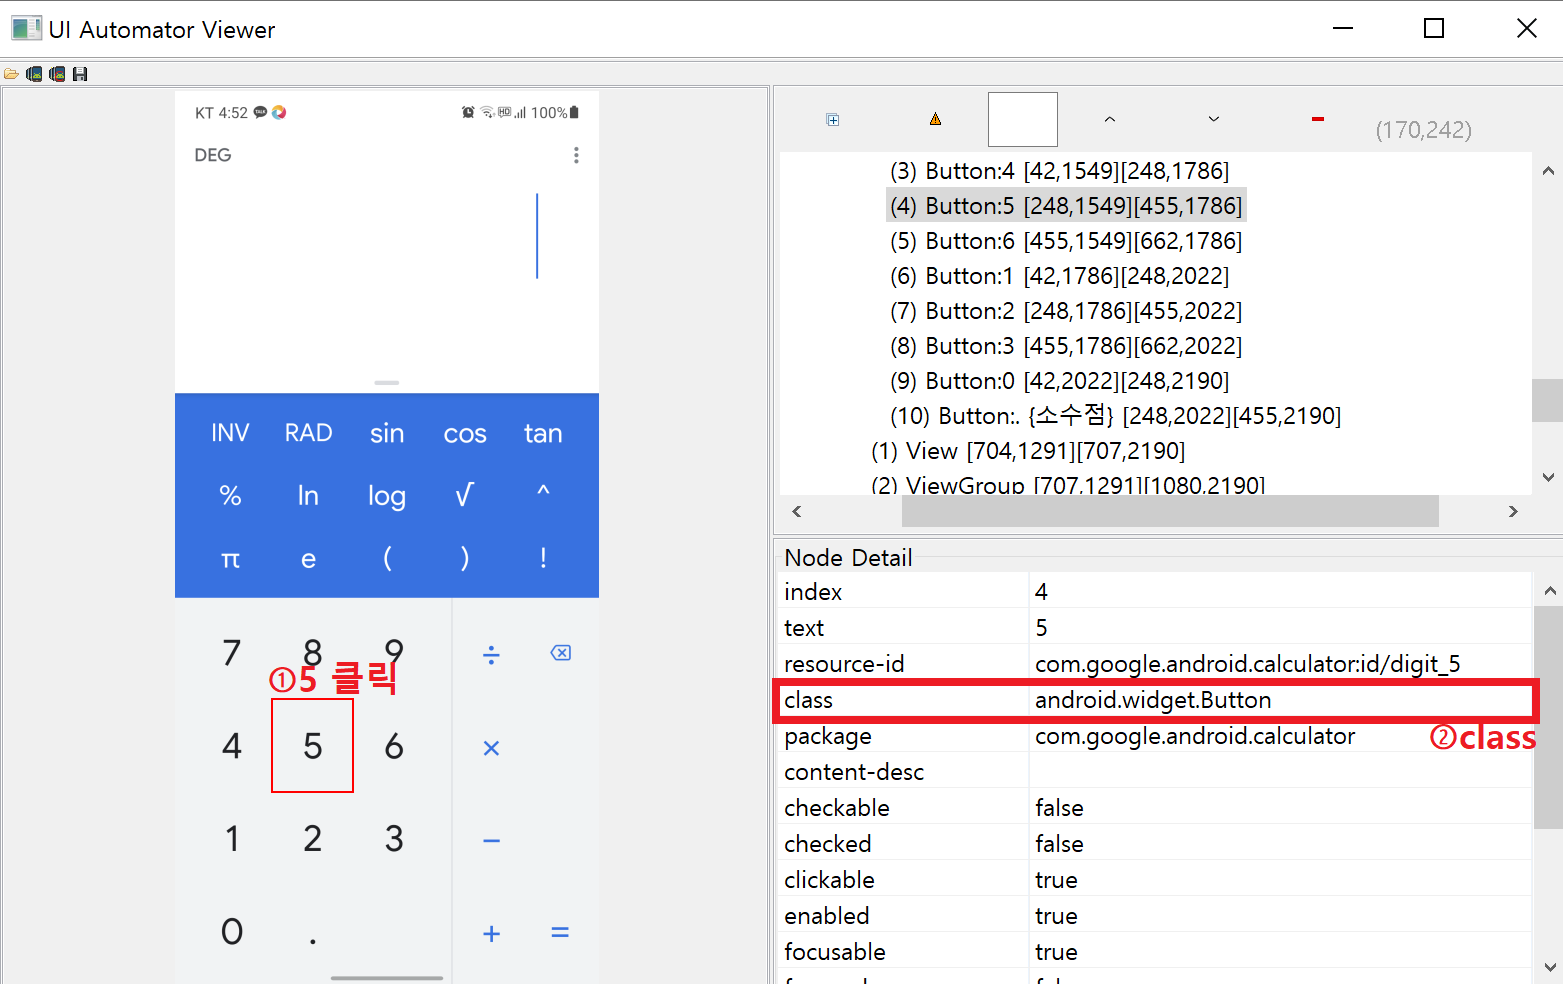
5 버튼을 탭하면 class가 android.widget.Button인 것을 알 수 있습니다.
이를 통하여 코드를 작성해보면
driver.findElementByXPath("android.widget.Button['정보']").click;가 됩니다.
[] 안에 들어간 '정보'는 다양한 값들을 넣을 수 있는데 index, text, resource-id, content-desc 등이 있습니다.
UI Automator Viwer의 정보를 이용하여 5를 누르는 코드를 작성해보면
//text를 이용하여 5를 입력
driver.findElementByXPath("//android.widget.Button[@text='5']").click();

//resource-id를 이용하여 5를 입력(contains을 사용하여 /뒤에 있는 digit_5만 입력해줍니다)
driver.findElementByXPath("//android.widget.Button[contains(@resource-id, 'digit_5')]").click();

//index를 이용하여 5를 입력
driver.findElementByXPath("//android.widget.Button[@index='4']").click();
가 됩니다.
해당 코드를 실행하면 다음과 같이 실행됩니다.
영상을 확인해보시면 마지막에 5가 아닌 tan을 탭하는 모습을 볼 수 있습니다.
분명히 5의 정보인 index = 4를 입력했는데 왜 tan 눌리는 걸까요?
이유는 tan의 index도 4이기 때문입니다.

appium에서 실행하는 자동화는 같은 값이 있을 때 최상단에 있는 값을 먼저 찾아냅니다.
tan의 index도 4, 5의 index도 4이지만 5보다 위에 있는 tan을 찾아 탭하는 것이지요.
이를 방지하기 위해선 and를 사용하여 복합적인 정보를 입력하면 됩니다.
//index와 text를 이용하여 5를 입력
driver.findElementByXPath("//android.widget.Button[@index='4' and @text=5]").click();

//index와 resoureced-id를 이용하여 5를 입력
driver.findElementByXPath("//android.widget.Button[@index='4' and contains(@resource-id, 'digit_5')]").click();
해당 코드를 실행하면 다음과 같이 실행됩니다.
index를 사용하였지만 tan이 아닌 5를 탭합니다.
좌표
xpath에 정보가 없거나 동일한 정보를 가지고 있는 경우 좌표를 이용해서 탭할 수 있습니다.
하지만 좌표를 사용하는 것은 추천해드리지 않습니다. 기기마다 좌표가 다르고, 외부 사정이나 팝업창으로 인해 오류 발생률이 높아지니 어쩔 수 없는 경우에만 사용하시길 바랍니다.
좌표를 이용하는 코드는 다음과 같습니다.
driver = new AndroidDriver<>(new URL("http://127.0.0.1:4723/wd/hub"), capabilities);

new TouchAction(driver).tap(PointOption.point(x, y)).perform();
코드만으로는 감이 오지 않을 테니 직접 실행해보겠습니다.
코드에 좌표를 입력하여 직접 실행해보겠습니다.

오른쪽 상단에서 5의 좌표를 확인할 수 있습니다. 해당 좌표를 탭하는 코드는 다음과 같습니다.
new TouchAction(driver).tap(PointOption.point(248, 1549)).perform();
해당 코드를 실행하면 다음과 같이 실행됩니다.
5를 탭하는 모습을 볼 수 있습니다. 영상에서 보신 것처럼 좌표를 입력하여 탭하는 방식은 빠르게 이루어지니 사이에 Thread.sleep(s);를 사용하여 간격을 두는 걸 추천드립니다.
반대로 xpath를 통해 Element의 좌표를 읽어와 좌표 값을 탭할 수 있습니다. 코드는 다음과 같습니다.
//getLocation()을 이용하여 xpath의 point를 저장
Point point = driver.findElementByXPath("//android.widget.Button[@text='5']").getLocation();

new TouchAction(driver).tap(PointOption.point(point)).perform();
종합
위에서 배운 내용을 바탕으로 계산을 수행해보도록 하겠습니다.
12*87을 수행하여 올바른 값인 1044를 출력하는지 확인하는 테스트
package test;

import java.net.URL;
import java.util.concurrent.TimeUnit;

import org.openqa.selenium.Point;
import org.openqa.selenium.remote.DesiredCapabilities;
import org.testng.Assert;
import org.testng.annotations.AfterClass;
import org.testng.annotations.BeforeClass;
import org.testng.annotations.Test;
import io.appium.java_client.AppiumDriver;
import io.appium.java_client.TouchAction;
import io.appium.java_client.android.AndroidDriver;
import io.appium.java_client.android.AndroidElement;

import io.appium.java_client.touch.LongPressOptions;
import io.appium.java_client.touch.offset.PointOption;

public class at {
	public static AppiumDriver<AndroidElement> driver;
	public static DesiredCapabilities capabilities = new DesiredCapabilities();

	@BeforeClass
	public void setUp() throws Exception {
		capabilities.setCapability("appPackage", "com.google.android.calculator");
		capabilities.setCapability("appActivity", "com.android.calculator2.Calculator");
		capabilities.setCapability("deviceName", "device");
		capabilities.setCapability("udid", "단말기의 UDID 번호 입력");
		capabilities.setCapability("unicodeKeyboard", "true");
		capabilities.setCapability("resetKeyboard", "true");

		driver = new AndroidDriver<>(new URL("http://127.0.0.1:4723/wd/hub"), capabilities);
		driver.manage().timeouts().implicitlyWait(10, TimeUnit.SECONDS);
	}

	@Test
	public void Test1() throws Exception {
		//text를 이용하여 1을 탭
		driver.findElementByXPath("//android.widget.Button[@text='1']").click();

		//resource-id를 이용하여 2를 탭(contains을 사용하여 /뒤에 있는 digit_2만 입력해줍니다)
		driver.findElementByXPath("//android.widget.Button[contains(@resource-id, 'digit_2')]").click();

		//index와 resoureced-id를 이용하여 x를 탭
		driver.findElementByXPath("//android.widget.Button[@index='2' and @content-desc='×']").click();

		//좌표를 지정하여 8을 탭 (좌표값을 탭하기 전에 2초의 여유 시간을 준다)
		Thread.sleep(2000);
		new TouchAction(driver).tap(PointOption.point(248, 1312)).perform();

		//getLocation()을 이용하여 xpath의 point를 저장 후 7탭
		Thread.sleep(2000);
		Point point = driver.findElementByXPath("//android.widget.Button[@text='7']").getLocation();
		new TouchAction(driver).tap(PointOption.point(point)).perform();

		//content-desc를 이용하여 = 탭
		driver.findElementByXPath("//android.widget.Button[@content-desc='등호']").click();

		//올바른 결과 값이 나오는지 확인 최종 결과 값을 저장하는 result_final의 text를 저장 후 올바른 결과와 비교한다.
		String result = driver.findElementByXPath("//android.widget.TextView[contains(@resource-id, 'result_final')]").getText();
		Assert.assertEquals(result, "1044");

		Thread.sleep(5000);
	}

	@AfterClass
	public void end() throws Exception {
		driver.quit();
	}
}
해당 코드를 실행하면 다음과 같이 실행됩니다.
마무리
오늘은 UI Automator Viewer를 이용하여 Element의 정보를 이용하여 탭하는 코드를 작성했습니다.
간단하지만 자주 사용하지 않으면 쉽게 잊어버리니 자주 사용하는 문법을 적어두시면 좋을 것입니다.